Frequently Asked Questions
After you have activated your email, go to the Microsoft Office Outlook Web App (OWA).
- Open a browser and go to https://outlook.office365.com/esc.edu.
- Enter your user name. Your user name is your email address. For example: FirstName_LastName999@esc.edu
- Enter your password.
The first time you go into your college email account, the time zone defaults to Monrovia, Reykjavik. You will need to update the current time zone field to your correct time zone.
To do this manually:
After logging in to OWA, click on the Settings icon ![]() located in the top right hand corner of the screen. Select Options.
located in the top right hand corner of the screen. Select Options.
In the left naviagation panel select General and then Regional and time zone.
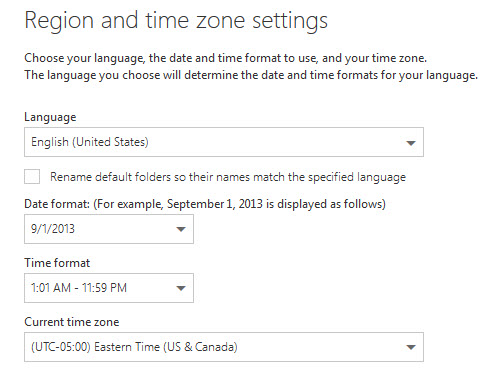
Select the appropriate time zone and Save.
You can install the Outlook application from your smartphone's app store. Sign into the Outlook application using your SUNY Empire email and password. Detailed instructions can be found at: Outlook for iOS and Android Help
Microsoft 365 mobile setup - Help:
Download and install Microsoft 365 on your PC or Mac
Enter your College credentials.
Username: FirstName_LastName999@esc.edu
Password: your College login password
NOTE: Windows 8 operating system (or later) required.
If you have an earlier version of Office installed on your PC and you install Office Home and Student 2016, Office Home and Business 2016, Office Professional 2016, or Office 365 Home, you won't have an option to upgrade over the previous version. Instead, you'll have both the new version of Office and your earlier version installed on the same PC. If you don't want both versions, you should uninstall the earlier version through Programs and Features in Control Panel.
Download and install Microsoft 365 on your PC or Mac
Enter your College credentials.
Username: FirstName_LastName999@esc.edu
Password: your College login password
NOTE: Windows 8 operating system (or later) required.
You can share any of your Exchange Server account contact folders with another person who is also using an Exchange Server account in your organization.
From your Outlook application:
- File -> Info -> to the right of Account Settings -> click on your picture
From the web:
- Sign-in to Microsoft 365
- In the upper right-hand corner, click on your picture
- About me -> Edit your profile -> Picture -> Change your photo (this should be a Professional picture as it represents you being affiliated with Empire State College)
Learn to narrow your search criteria for better searches in Outlook:
Keyboard shortcuts are a helpful to use your applications more efficiently. (ex. Ctrl+P to print)
Hold the CTRL key down on your keyboard and roll your mouse wheel. This will act like the slider bar and zoom the text in or out. This also works in the preview pane and on regular websites.
Outlook client:
- click on the People icon (lower left corner)
- Home tab => New contact => New contact group
Outlook Web App (OWA):
- login to Office 365
- click on the App Launcher icon (grid in the upper left corner)
- click on the People icon
- New Contact => Contact list
Using Outlook Web App (OWA) to read your mail, how do you change the Default from Reply All to Reply?
- Click Settings gear icon and then select "View All Outlook Settings" from the settings sidebar.
- Make sure the 'Mail' section is selected.
- Expand the 'Compose and Reply' section.
- Scroll to"Reply or Reply All".
- Select the "Reply" setting click Save.
- Return to your Outlook screen. The default action will now be Reply.
An inbox rule is an action that Microsoft Outlook performs automatically upon incoming or outgoing messages, based on conditions that you have specified. You can create a rule from a template, from a message, or using your own conditions.
Use rules to manage your email
Overview of the Junk Email Filter
No one likes spam or junk email. The Outlook Junk Email Filter doesn’t stop delivery of junk email messages, but does the next best thing—it moves suspected spam to the Junk Email folder.
Turn on Spellcheck in Outlook
- Click File > Options > Mail
- Under Compose messages, check the Always check spelling before sending box
The best way to enter Recipient Names in the "To..." field when composing a New email is:
- Click the "To..." button
- In the Select Names dialog box, start typing the Recipient's name
- Select the Person from the list
- Click the "To->" button
- Click OK
In the future, that person will be auto-filled when you start to type their Name in the "To..." field.
Open your Outlook application
File > Info > Tools > Mailbox Cleanup
Recall or replace an email message that you sent
If you have the Simplified Ribbon, double click the email you would like to recall to open it in it's own window, then select the Message tab and then select More commands (...). Point to Actions and select Recall This Message.
Open Outlook / Home tab / Left hand pane / Deleted Items folder.
FYI: Email in your Deleted Items folder will remain there until you manually remove it.
- Open Outlook (Microsoft 365)
- In the lower left, Right-click on "Calendar"
- Choose "Open in new window"
If you have questions about using OneDrive for Business, you can contact the IT Service Desk at http://sunyempire.edu/service-desk/.
More detail is available in this article, "Sync OneDrive for Business or site libraries to your computer."
- Open your mail using OWA (Outlook Web App) => https://outlook.office365.com/esc.edu
- Select the message you want to move.
- Right-click on that message and select "Move."
- Move the message to the desired folder.
You will want to download and install the Outlook app via your phone's application store. You can then sign into the application using your college sign on.
In Outlook there are two (2) options:
- select the first email - hold down the shift key - click the last email - select move delete (this assumes all deleted messages are in order) or;
- If the messages are not all grouped together - you can also do Ctrl-Click to individually select/deselect messages for deletion.
- Login to Microsoft 365 and open your mail
- In the upper right-hand corner, click the Gear / Options > View all Outlook settings
- Go to the Compose and Reply settings
- Scroll to Message Format and the options to edit the format will be present.
Click on your picture in the Upper-right corner.
Choose "Sign out."